Time machine is Apples computer backup solution and it works great. I have been using it for 6 years and even supported it for a couple years in Applecare way back when. The nice part about it is you plug a new hard drive and it prompts you with a question asking to use for backups and bam off to the races in 1 click.
Under the hood
Just like all of Apples fancy magic GUI based tools Time machine is actually backed by command line goodness that the power user can make Time Machine go above and beyond the basic “magic” way of getting things done. In Time machines case you can use the command line to make any mountable volume into a backup disk. Now this might not sound like that big of a deal but what it means is that you can use any hard drive formatted in any manner using a variety of protocols to backup your Mac if that’s what you desire. In my case I have a Raspberry Pi in the living room with a 3TB exfat Hard drive that is only barely used and I decided it would make a good network backup server as well.
 On the Pi
The easiest way to do this with the Pi would be Samba. Samba is an open source project that allows you share volumes out as Windows shares.
In some cases your distribution may already have a share for mounted USB devices but in this case I’ll assume it doesn’t
Make sure your external drive/usb stick/flashcard/whatever is mounted to your Pi somewhere. Sometimes these are mounted for you automatically by the distribution like in Rasbmc’s case all USB drives get automatically mounted to /media/
If that is not your case mount the disk to a folder of your choosing (usually in /mnt or /media) then proceed
Install Samba
sudo apt-get install samba samba-common-bin
Once installed use the editor of your preference to edit the configuration file.
vim /etc/samba/smb.conf
Here is a basic configuration that will allow you to mount and read/write the drive from the Mac
[BackupShareName]
browsable = yes
read only = no
valid users = pi
path = /media/BackupVolumeName
force user = root
force group = root
create mask = 0660
directory mask = 0771
This uses the already existing Pi user, like I said I was being basic. it would be sensible to make a new user/password for this purpose.
Restart/start Samba
/etc/init.d/samba restart
You should be able to mount the drive from the Mac now and it should appear on the sidebar of Finder. You will have to use “Connect As” and change the credentials. If it did not appear on the sidebar you can use the Go menu on Finder and “Connect to Server” with smb://your.pi.ip.address.
On the Mac
The Mac should now have a mounted volume in Finder that you can write to. What we need to do now is create a Sparse bundle disk image on the mounted volume. Go into Applications -> Utilities and open the Disk Utility.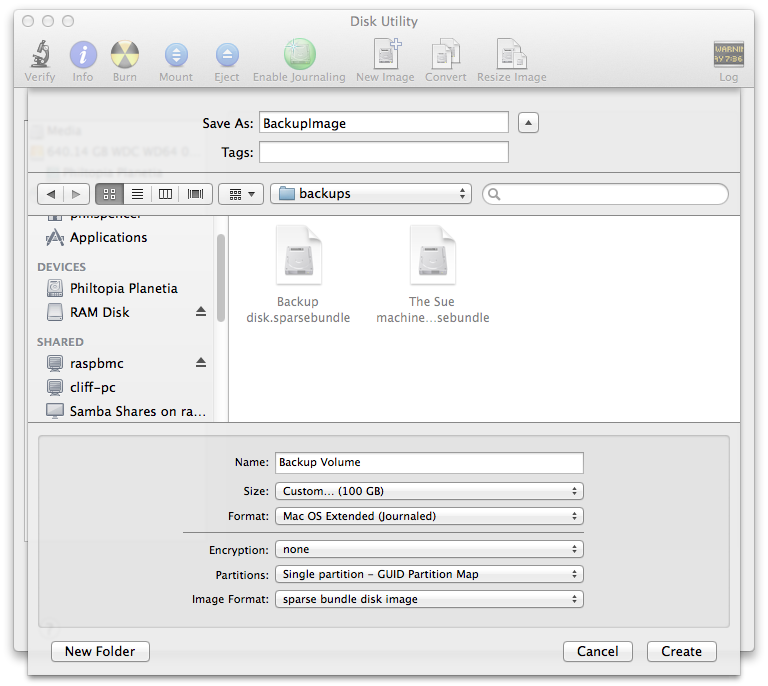
Don’t select any volumes yet
- Click New image
- Name the image
- Set the appropriate size for your backup volume
- Format Mac OS Extended Journaled (if you formatted your OS as case sensitive you’ll need to use that as well)
- Encryption: None (unless you want to I suppose)
- Partitions: Single Partition GUID
- Image Format: Sparse bundle disk image
- Make sure you have expanded the advanced carrot on the save location and save it to the mounted remote volume
- Click Create
Now you have a sparse bundle on your mounted volume. Time to make the Time Machine magic happen.
First open the sparse bundle and it will mount on the sidebar of Finder. What this also does is puts it into /Volumes on the filesystem which is the key to pulling this all together. Essentially anything you can get to mount can be used for Time Machine if it is in the proper Mac filesystem format.
Second, use the tmutil command from the command line to set the backup
sudo tmutil setdestination /Volumes/MountedSparseBundleName
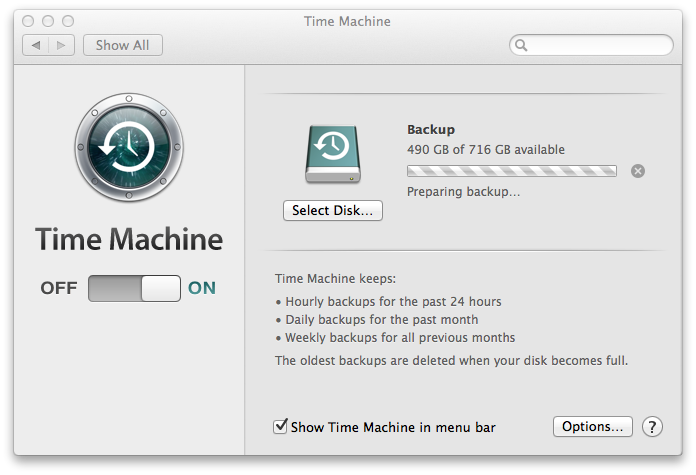 Open Time Machine from System preferences and you should see that it now shows a backup Volume being active.
If you do have a case sensitive system and you didn’t make a case sensitive bundle you will get an error. Go back and re create the bundle to match your computers filesystem.
Now when you wish to do a backup all you need to do is mount the remote volume and sparse bundle on your Pi and let it run.
Man! Thanks so much! I’ve been jumping through hoops, installing netatalk etc to make TM work. This method is soooo much simpler. I’ve got my first backup running now. I see no reason why this wouldn’t work with a $20 pogoplug, which I’ve ordered.
It’s a wonder this method isn’t more widely known!
Thx!
Yea netatalk was suggested to me as well and I ran into issues, this works pretty simply by default on most Pi Distros
It´s a realy good idea, but on my Mac (with OSX 10.10.1) it is rather slow
==> estimated Time für 350MB 19h!!!!
I also tried do use AFP with netatalk, but this is also slow – any idea what went wrong?
19H?! Yikes, even a 15GB backup over wireless wasn’t that slow for me…. Check your load average on the Pi, see if any other process besides samba/netatalk are hogging the resources.